electron安装及快速创建
创始人
2024-11-21 03:35:04
electron安装及快速创建
electron是一个使用 JavaScript、HTML 和 CSS 构建桌面应用程序的框架。
详细内容见官网:https://www.electronjs.org/zh/docs/latest/。
今天来记录下练习中的安装过程和hello world的创建。
- 创建项目文件夹,并执行npm 初始化命令。
初始化过程中,会填写一些信息:entry point 应为 main.js,author 与 description 是打包是必填项。
npm init - 将electron 依赖到项目中,由于官方地址出现网络问题,需要修改镜像地址。
创建文件.npmrc,并添加如下内容:
ELECTRON_MIRROR="https://npmmirror.com/mirrors/electron/" - 执行命令:
npm install electron --save-dev - 确保package.json文件中有如下内容,用于后续启动项目:
{ "scripts": { "start": "electron ." } } - 创建main.js
// Modules to control application life and create native browser window const { app, BrowserWindow } = require('electron') const path = require('node:path') const createWindow = () => { // Create the browser window. const mainWindow = new BrowserWindow({ width: 800, height: 600, webPreferences: { preload: path.join(__dirname, 'preload.js'), nodeIntegration: true, contextIsolation:false } }) // 加载 index.html mainWindow.loadFile('index.html') // 打开开发工具 // mainWindow.webContents.openDevTools() } // 这段程序将会在 Electron 结束初始化 // 和创建浏览器窗口的时候调用 // 部分 API 在 ready 事件触发后才能使用。 app.whenReady().then(() => { createWindow() app.on('activate', () => { // 在 macOS 系统内, 如果没有已开启的应用窗口 // 点击托盘图标时通常会重新创建一个新窗口 if (BrowserWindow.getAllWindows().length === 0) createWindow() }) }) // 除了 macOS 外,当所有窗口都被关闭的时候退出程序。 因此, 通常 // 对应用程序和它们的菜单栏来说应该时刻保持激活状态, // 直到用户使用 Cmd + Q 明确退出 app.on('window-all-closed', () => { if (process.platform !== 'darwin') app.quit() }) // 在当前文件中你可以引入所有的主进程代码 // 也可以拆分成几个文件,然后用 require 导入。 - 创建index.html
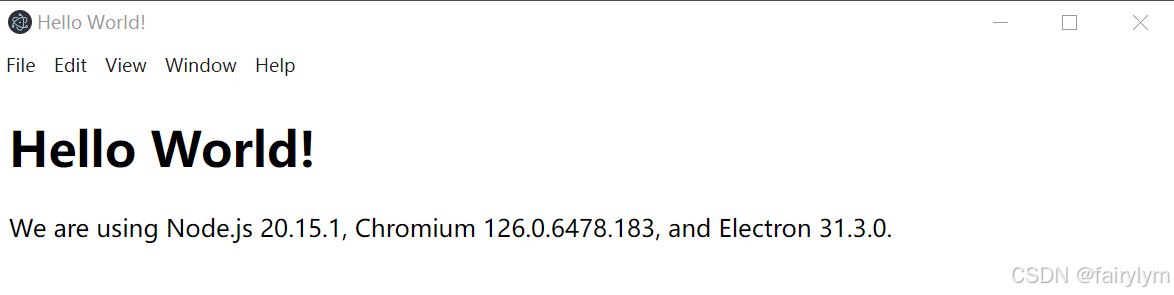
Hello World! Hello World!
We are using Node.js , Chromium , and Electron . - 创建preload.js
// 所有的 Node.js API接口 都可以在 preload 进程中被调用. // 它拥有与Chrome扩展一样的沙盒。 window.addEventListener('DOMContentLoaded', () => { const replaceText = (selector, text) => { const element = document.getElementById(selector) if (element) element.innerText = text } for (const dependency of ['chrome', 'node', 'electron']) { replaceText(`${dependency}-version`, process.versions[dependency]) } }) - 执行启动命令看效果
npm start - 打包,以下命令逐行执行后,会产生out文件夹,里面是打包文件。
npm install --save-dev @electron-forge/cli npx electron-forge import npm run make - 再记录下关于报错【Uncaught ReferenceError: require is not defined】的解决方法:(1)先确定main.js里new BrowserWindow的webPreferences里是否包含nodeIntegration: true和contextIsolation:false,如下代码。(2)如果没有效果,再加上执行命令npm install -g browserify。
const createWindow = () => { // Create the browser window. const mainWindow = new BrowserWindow({ width: 800, height: 600, webPreferences: { preload: path.join(__dirname, 'preload.js'), nodeIntegration: true, contextIsolation:false } }) 相关内容
热门资讯
国际最新研究:蝴蝶蜜蜂等传粉者...
北京5月7日电 (记者 孙自法)国际学术期刊《自然》最新发表一篇生态学论文称,一项研究显示,在尼泊尔...
Anthropic发布10个金...
2026年5月5日晚,Anthropic的一次发布,让华尔街的很多人没睡好觉。 这家AI公司一口气推...
原创 4...
## 933图片插入失败: 'NoneType' object has no attribute '...
三星造工厂机器人、Meta做家...
据韩国中央日报5月7号报道,全球人工智能竞争正加速向物理AI领域延伸,人形机器人成为产业霸权新焦点。...
超22万颗GPU!SpaceX...
来源:环球网 【环球网科技综合报道】5月7日消息,据《福布斯》报道,美国太空探索技术公司(Spac...