基于YOLO8的目标检测系统:开启智能视觉识别之旅
创始人
2024-11-19 00:04:22
文章目录
- 在线体验
- 快速开始
- 一、项目介绍篇
- 1.1 YOLO8
- 1.2 ultralytics
- 1.3 模块介绍
- 1.3.1 scan_task
- 1.3.2 scan_taskflow.py
- 1.3.3 target_dec_app.py
- 二、核心代码介绍篇
- 2.1 target_dec_app.py
- 2.2 scan_taskflow.py
- 三、结语
在线体验
- 基于YOLO8的目标检测系统

- 基于
opencv的摄像头实时目标检测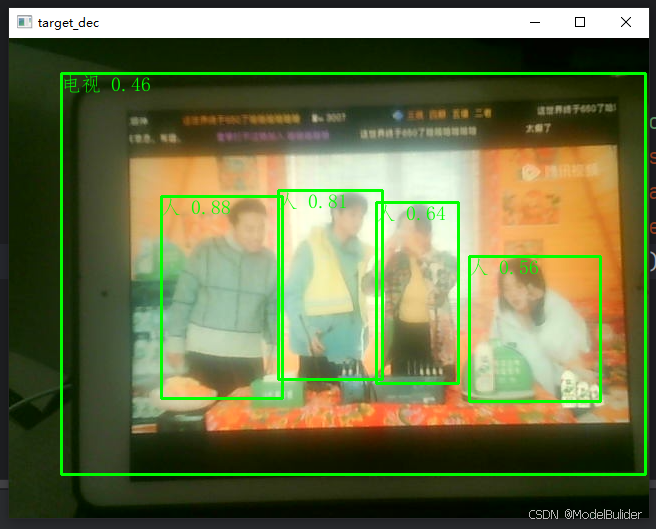
快速开始
- 创建
anaconda环境
conda create -n XXX python=3.10 - pytorch安装
# 查看cuda版本(示例为:11.8) nvcc -V 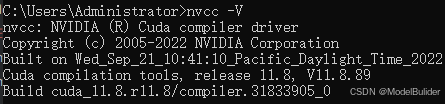
# 安装对应版本的pytorch # 官网:https://pytorch.org/ # pip安装 pip3 install torch torchvision torchaudio --index-url https://download.pytorch.org/whl/cu118 # conda安装,建议配置conda国内镜像源 conda install pytorch torchvision torchaudio pytorch-cuda=11.8 -c pytorch -c nvidia 
- 其他依赖包安装
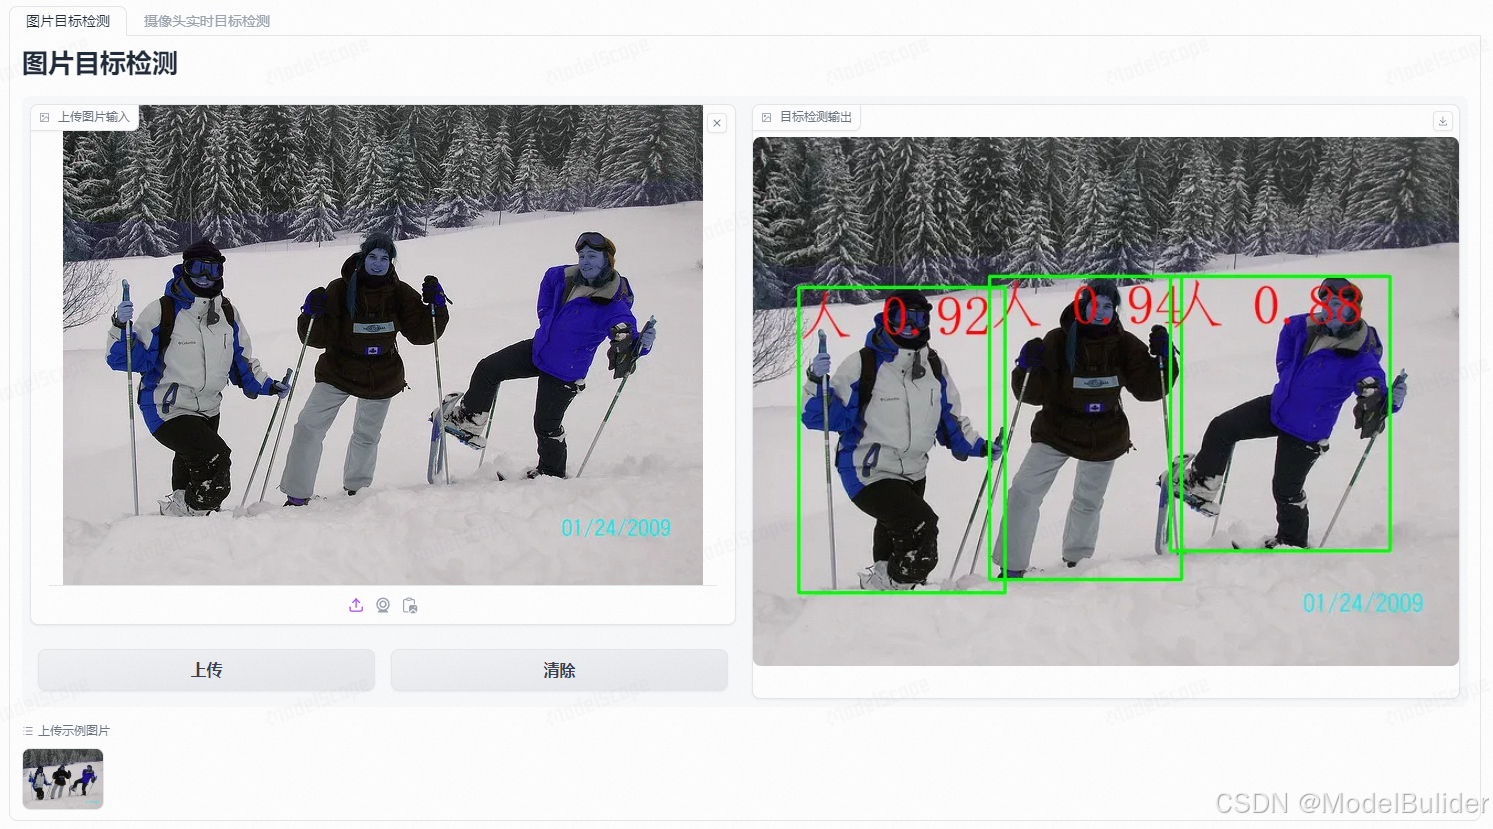
pip install -r ./requirements-target-dec.txt - 网页界面如下,可在示例图片中快速进行试验

一、项目介绍篇
在人工智能和机器学习的浪潮中,YOLO8作为目标检测领域的一颗新星,以其卓越的性能和灵活性,受到了广泛关注。本项目基于YOLO8算法,构建了一个高效、易用的目标检测系统,旨在为用户提供一个强大的本地部署解决方案。通过精心设计的界面和丰富的功能,用户可以轻松实现目标检测任务,无论是在网页端还是本地计算机上。
1.1 YOLO8
- YOLO8是新一代的目标检测算法,由YOLO(You Only Look Once)系列发展而来。它继承了YOLO算法快速、高效的特点,并在此基础上进行了改进和优化,以适应更复杂的目标检测任务。YOLO8通过引入新的网络结构和训练策略,提高了检测的准确性和鲁棒性,尤其是在小目标和遮挡目标的检测上表现出色。
- YOLO8算法的关键创新包括:
- 改进的网络结构:YOLO8采用了更深层次的卷积神经网络,增强了特征提取的能力,使得模型能够更准确地识别和定位目标。
- 优化的锚框机制:通过优化锚框的设计,YOLO8能够更好地适应不同形状和大小的目标,减少了误检和漏检的情况。
- 增强的数据增强技术:YOLO8使用了更先进的数据增强方法,提高了模型对不同环境和条件的泛化能力。
- 高效的训练策略:YOLO8引入了新的损失函数和训练技巧,加快了模型的收敛速度,同时保持了检测性能。
- YOLO8的这些改进使得它在实时性要求高的应用场景中,如视频监控、自动驾驶等领域,具有广泛的应用前景。尽管YOLO8的具体细节和性能指标尚未完全公开,但其在目标检测领域的潜力已经引起了业界的广泛关注。
1.2 ultralytics
- Ultraalytics是一家专注于计算机视觉和人工智能技术的公司,以其开发的高性能目标检测模型YOLO(You Only Look Once)而闻名。YOLO模型以其快速和准确的目标检测能力在业界获得了广泛认可,特别是在需要实时处理的场合,如视频监控、自动驾驶和工业自动化等领域。
- Ultraalytics的YOLO算法通过单次前向传播即可预测图像中的物体位置和类别,与传统的多步骤检测方法相比,大大提高了检测速度。随着YOLO算法的迭代发展,Ultraalytics不断推出新版本,如YOLOv3、YOLOv4、YOLOv5等,每个版本都在准确性、速度和易用性方面进行了优化。
- 除了目标检测,Ultraalytics还提供其他AI解决方案,包括图像分割、数据标注工具和模型部署服务。公司致力于推动AI技术的创新和应用,帮助企业实现智能化转型。Ultraalytics的技术和产品因其高效性和可靠性,在全球范围内拥有众多用户和合作伙伴。
1.3 模块介绍

1.3.1 scan_task
- 构建了执行的任务,用于为
scan_taskflow提供可执行对象
1.3.2 scan_taskflow.py
- 基于open-cv2的本地界面系统
1.3.3 target_dec_app.py
- gradio页面代码
二、核心代码介绍篇
2.1 target_dec_app.py
import cv2 import gradio as gr from scan_task import ScanTargetDec scan_model = ScanTargetDec(version='YOLOv8n', use_gpu=False) def target_scan(frame): frame, _ = scan_model.run(frame, text_size=50) '''run方法其他可传参数 text_color: 显示文字颜色 默认:(0, 0, 255) text_size: 显示文字大小 默认:20 y_pos: y轴位置偏移量 默认:0 ''' return frame if __name__ == '__main__': examples = [ [cv2.imread('./examples/image_detection.jpg')]] with gr.Blocks() as demo: with gr.Tabs(): # 图片目标检测 with gr.Tab(label='图片目标检测') as tab1: gr.Markdown(value="# 图片目标检测") with gr.Row(variant="panel"): with gr.Column(): img_input1 = gr.Image(label="上传图片输入", mirror_webcam=False) with gr.Row(variant="panel"): submit_bn1 = gr.Button(value='上传') clear_bn1 = gr.ClearButton(value='清除') img_out1 = gr.Image(label="目标检测输出", mirror_webcam=False) # 添加演示用例 gr.Examples(label='上传示例图片', examples=examples, fn=target_scan, inputs=[img_input1], outputs=[img_out1], cache_examples=False) submit_bn1.click(fn=target_scan, inputs=img_input1, outputs=img_out1) clear_bn1.add([img_input1, img_out1]) # 摄像头实时目标检测 with gr.Tab(label='摄像头实时目标检测') as tab3: gr.Markdown(value="# 摄像头实时目标检测") with gr.Column(variant='panel') as demo_scan: with gr.Row(variant="panel"): img_input3 = gr.Image(label="实时输入", sources=["webcam"], mirror_webcam=False, streaming=True) img_out3 = gr.Image(label="目标检测输出", sources=["webcam"], mirror_webcam=False, streaming=True) img_input3.stream(fn=target_scan, inputs=img_input3, outputs=img_out3) demo.launch() - 此段代码主要是用于生成前端页面,以及配置按钮点击事件触发时的回调函数
- 可配置参数包括:
use_gpu、text_color、text_size、y_posuse_gpu: 是否使用gputext_color:定位的二维码,显示文字颜色 默认:(0, 0, 255)text_size:定位的二维码,显示文字大小 默认:20y_pos:y轴位置偏移量 默认:0
2.2 scan_taskflow.py
class ScanTaskflow: def __init__(self, task: str, video_index=0, win_name='Scan XXX', win_width=800, win_height=600, **kwargs): ..初始化摄像头扫描对象,设置窗口尺寸等属性.. def run(self, **kwargs): ..开启摄像头,进行检测任务.. if __name__ == '__main__': # 启动默认的目标检测系统 scanTaskflow = ScanTaskflow(task='scan_target_dec', version='YOLOv8n', use_gpu=True, video_index=0, win_name='target_dec', win_width=640, win_height=480) scanTaskflow.run(text_color=(0, 255, 0), y_pos=0) __init__用于预加载项目所需模型run是检测系统的核心方法,用于将视频的实时帧进行检测
三、结语
- 本项目提供了一个基于YOLO8算法的目标检测系统,它不仅易于部署和使用,而且具备高性能和高灵活性。我们相信,随着技术的不断进步和社区的积极参与,本项目将能够为更多用户提供价值,推动目标检测技术的发展。如果您在使用过程中遇到任何问题,欢迎在ModelScope创空间-基于YOLO8的目标检测系统上提出issue,我们会及时为您解答。
- 希望本项目能够成为您在目标检测领域的得力助手。如果您觉得本项目对您有帮助,请给项目点个star,并持续关注我的个人主页ModelBulider的个人主页
下一篇:1、hadoop环境搭建
相关内容
热门资讯
刚刚,Claude最新功能泄露...
新智元报道 编辑:定慧 大卫 【新智元导读】2026年5月4日,testingcatalog在An...
高分辨大宽带集成光子光谱仪成功...
麦姆斯咨询获悉,近日,中国科学院南京天文光学技术研究所天文光子学团队在面向天文观测的高分辨大宽带集成...
性价比高又稳定的云手机哪个好?...
作为搬了4年砖、踩过无数云手机坑的老玩家,今天直接给你们唠唠性价比高又稳定的云手机选法,全是实战干货...
以灵石破局,万物云参编国内首部...
4月23日,由低碳智慧建筑产业技术创新战略联盟与北京清华同衡规划设计研究院有限公司主办、万物云作为协...
专访 | CLA成功反哺全球 ...
2026年,是奔驰诞生的140周年,也是奔驰进入中国内地市场的20周年。 140年间,从第一款汽车问...